
So this time we we look at another 2 turns of the campaign, which will include some recruitment so you will get to see how that is achieved in this campaign.
Year 1, Month 2
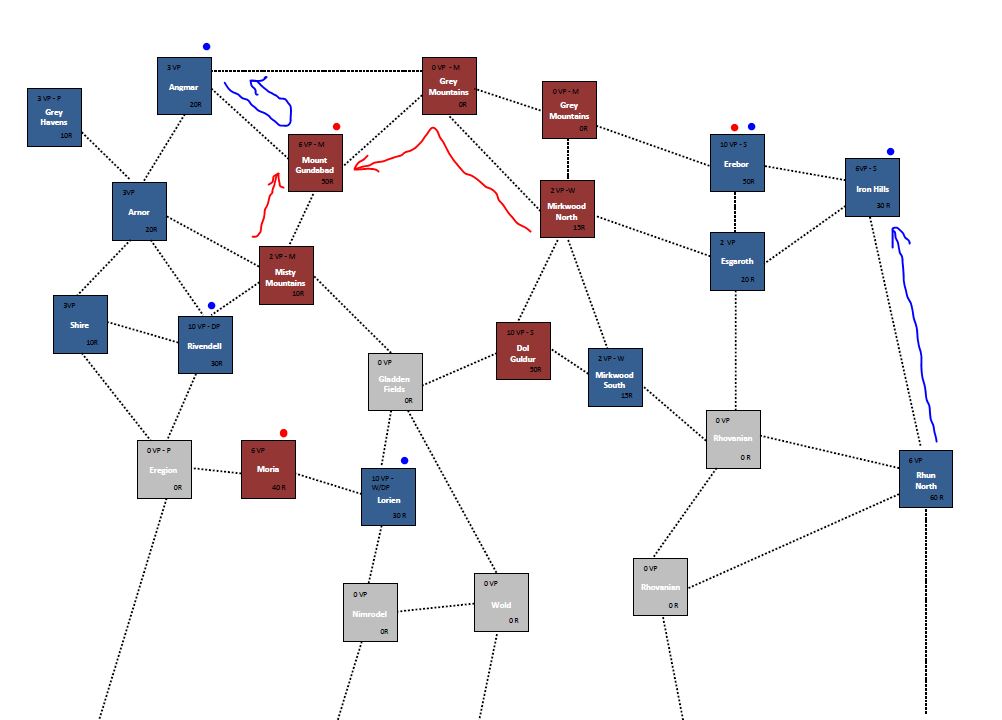 |
| Year 1, Month 2 North |
In North it was relatively quite this time round. With the forces of Good in the Northwest deciding to push their advantage into the Misty Mountains. Unfortunately evil side had seen and moved both they banners to the location.
So a quick run over some rules. If i haven't mentioned before cavalry banners move 2 spaces. At the beginning of the turn both sides right down all their orders for their banners and are all revealed at once. In the case as in here where two banners have moved to a fighting location, then each banner is built as a separate force, which will break as individuals too. Though for scoring VP in a scenario, count the whole force as one. This makes rapidly formed banners a little more fragile than a single banner of the same points.
Even with the help of Arathorn and Paladin Took, the forces of good were pushed back but with few casualties.
While in the East the successful Rhun force marches back to the Iron Hills to try and bring aid to Erebor.
 |
| Year 1, Month 2 South |
In the South Evil push on, putting Dol Amroth under siege, and taking Edoras. In the center good pulled back our depleted forces to Pelanor Fields, which was in turn attacked. But at Pelanor with 3 seperate forces we managed to force back the Evil army. In the battle special mention must go to my lone surviving warrior of rohan with an axe, who after passing courage tests every turn to stay in the battle till the end slew no less (with the help of piercing strike) 3 Morannaon and killed the Ringwraith: The Knight of Umbar. Giving us our first named hero death.
Unfortunately as we had pulled our forces back we lost Cair Andros without a fight.
Year 1, Month 3
 |
| Year 1, Month 3 North |
 |
| Year 1, Month 3 South |
This is the last turn before we have some recruitment, as such it was rather peaceable. Evil took Helms Deep with what was slight miss understanding of the rules (So the Evil side said).
Whenever you create a banner whether new from recruitment or from dividing banners no banner created (or that remains in the case of a divide) may be of less then 200pts. After a battle, if the remaining points is less than 100pts then the banner is destroyed: though any named characters are only destroyed if they died in the battle, else fate has intervened an the may be recruited to another banner.
Other than that players were happy where it stood and just traded some port towns, so it was on to recruitment.
During the first year recruitment occurs at the end of every third month, in the second year every fourth month and in the final year every fifth month. These means the later in the campaign the harder it becomes to recruit.
To work out your team recruitment points, add up all the recruitment values (the number in the bottom of location followed by a R) of the territories that you started with and that you still own and are not under siege. Then add to that the enemy territories you have gained but count their recruitment values as halved (rounding up fractions), but are also not under siege. The total is the amount of points you have to spend adding to banners or creating new ones in any territory you own, though you may never spend points to bolster banners that are under siege as new recruits cant get to them.
So we're a quarter way in to our first year and it is looking rough for the good in the south!
Till the next time, Dha Weles!
I am really enjoying this campaign, keep them coming and also keep slipping in the little nuggets of info on the rules etc.
ReplyDelete